How to Import Offline Conversions Into Google Ads
The result: Google Ads learns which of your clicks became paid jobs, and the money each paid. Time: about 40 minutes by hand the first time, then about two minutes a week. After that, HeadHoncho can send it for you.
You only need to do this once by hand to see how it works. It is worth it. It shows you what is inside the file Google receives.
What You Need First
- Auto-tagging on in Google Ads. This puts a click ID, called a GCLID, on each click.
- A click ID saved against each customer. A call tracker or your website form must catch it when the customer calls or books.
- The jobs that paid, with the date and the money.
Google Ads Offline Conversion Import: Get the Click IDs
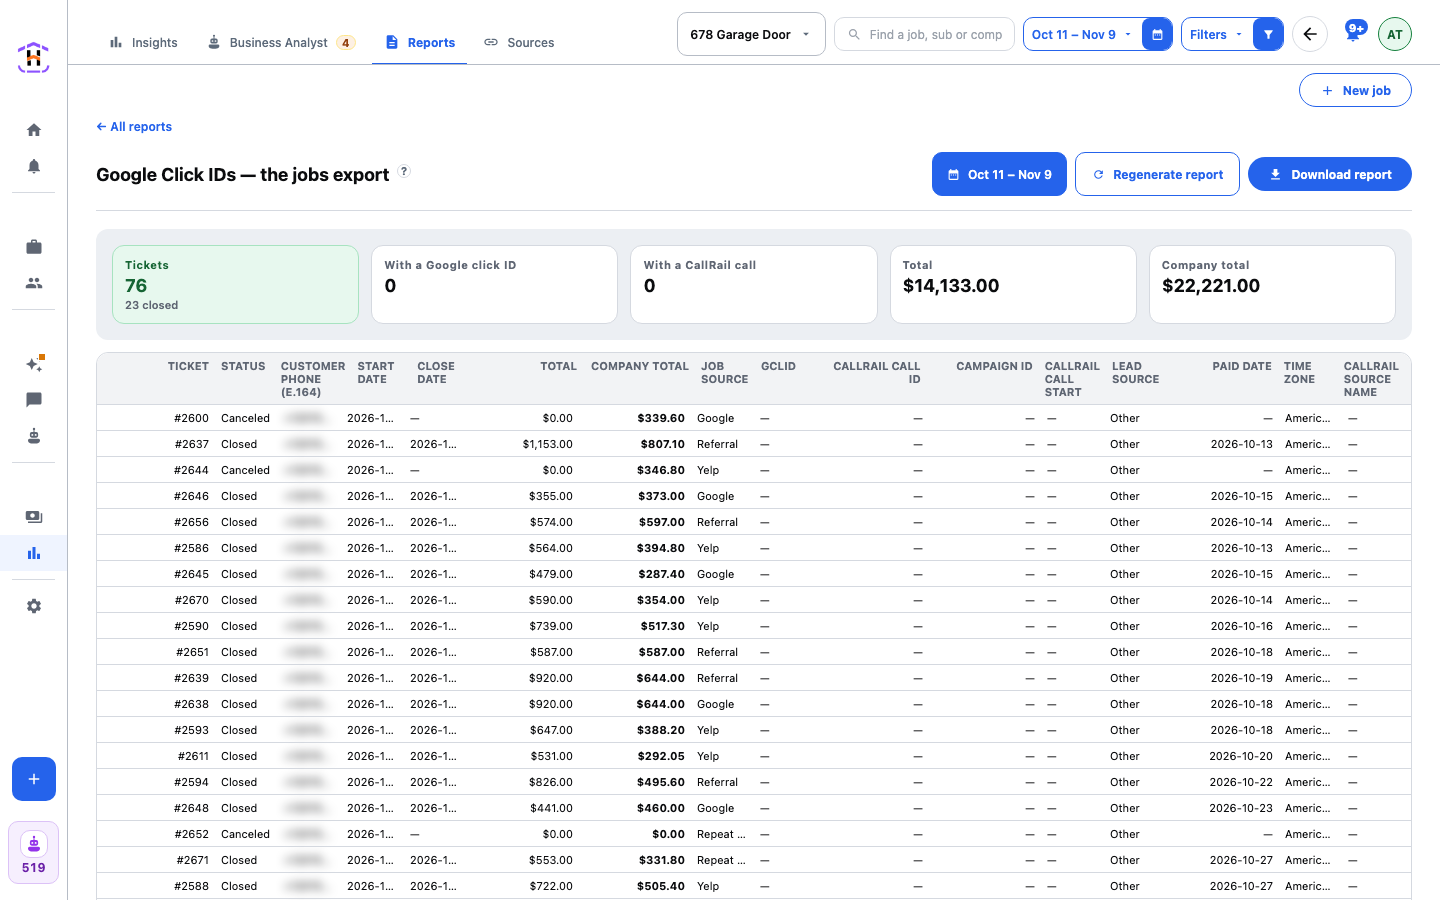
In HeadHoncho, open Reports and run Google Click IDs, the jobs export. Each row is a ticket with its status, phone, dates, total, company total and the gclid. A ticket with a gclid came off a Google click. A ticket with a blank gclid has no click behind it that we could tie to it. Do not guess for those.
Make the Conversion Action in Google Ads
- In Google Ads, open Goals, then Conversions. Create a new conversion action that imports from files, tracking conversions from clicks. Google's help page "Import offline conversions" shows the current screens. Menu names move around.
- Name it, for example "Paid job". Remember the spelling. It must match your file exactly.
- Wait 4 to 6 hours before you upload for a brand new action. Google says to.
Build the File
- Put your time zone in the first row. Google recommends a zone name, such as
Parameters:TimeZone=America/Chicago. - Add a header row with the columns
Google Click ID,Conversion Name,Conversion Time,Conversion ValueandConversion Currency. The first three are required. Keep the column that begins with "Google Click ID", or the import fails. - Add one row per paid job. The click ID from the export, the exact conversion name, the time, and the value.
Example, with made-up numbers. A garage door job paid $2,400. After the door, the springs and the sub's cut, $1,100 was left. You decide the value is what was left, because that is what the click earned you.
| Google Click ID | Conversion Name | Conversion Time | Conversion Value | Conversion Currency |
|---|---|---|---|---|
| (example click ID) | Paid job | 2026-11-05 14:30:00 | 1100.00 | USD |
Pick one value basis and keep it. Revenue, gross profit and profit after the sub teach Google different things. A $2,400 door and a $150 lock stop looking the same only if the value is real. See the offline conversion entry for why.
Upload It
- In Google Ads, open Goals, then Conversions, then Uploads.
- Press the plus button, choose a source, pick your file. Say whether any user data is hashed. A click ID file has none.
- Press Preview to check the file. Then press Apply.
Upload an extra day of data with each import, because the last day may not have recorded yet. If you may upload the same job twice, add the optional Order ID column with the ticket number, so Google can tell it is the same job.
How You Know It Worked
The Uploads page shows the file as processed with no errors. Google says data can take 24 to 48 hours to show in reports. Then the conversion column in your campaigns includes your paid jobs.
If It Fails
- The name does not match. Conversion Name must match the action's name exactly, spelling and capitals.
- The click ID column is missing or renamed. The header must begin with "Google Click ID".
- No time zone. Put it in the first row or on every time.
- The click is too old. HeadHoncho treats a click as expired after 90 days, and so should your file. An older row will not count.
- The click ID was cut or retyped. Copy it from the export, whole.
- The time is before the click. A conversion cannot happen before the click that caused it.
Now Let HeadHoncho Do It
Open Automations, then Marketing, then Send Booked Jobs to Google Ads. Press the switch for your company and answer five questions: the account, which jobs count, what a job is worth, the goal, and when the report goes. The default sends once a week, valued at profit after the sub. It creates the goals for you, names them, and sends the same rows you just built. Every setting is on the docs page. The whole idea is in Tracking a Lead All the Way to the Job.